Manufacturing methods and the dreaded middle ground of medium-scale production

As a mechanical engineer, the best part of my job is when I get to hold the first samples of a part I designed in my CAD (computer-aided design) program for the first time. It’s a fantastic feeling to imagine that this thing has never existed before and I’m the first to see and hold it. It can be very validating and feel amazing when everything works as intended, but oftentimes you find issues and errors to polish out before finalizing your design.
Prototyping is a critical part of designing products, as it gives you the ability to iterate faster and test various concepts simultaneously. On a computer, it’s very difficult to get a perfect sense of scale, test assembly methods, and ensure parts feel solid when assembled. Having physical, tactile components in hand makes it far simpler.
Prototypes are made for a variety of purposes:
- Understanding ergonomics and form with low-fidelity mockups
- Creating cosmetic models representative of the final manufactured product for photographs
- Testing the functionality of a mechanism
- Timing and documenting the assembly process
- Testing for water and dust ingress
Choosing the right manufacturing method and material for your prototype or final product isn’t an easy task, however. A 3D print may be perfectly fine for testing form studies but would be unacceptable to sell to a customer. An expensive CNC-machined prototype may be a great method of testing a complicated mechanism that will eventually be manufactured using injection molding.
Below, we look at a handful of prototyping and manufacturing options to better understand how they work, what types of parts they can create, and the limitations of each method. There may be multiple manufacturing methods that are the right solution for your needs, and learning how and when to use each method enables you to make the right selection based on your timeline, quantity of units needed, application, and end goals.
Injection molding
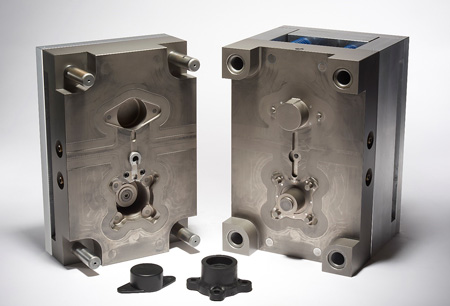
Chances are, there are dozens of injection-molded parts within arms reach from you at this moment. Injection molding is one of the most common methods for manufacturing plastic parts, due to the low part cost and high repeatability. Keyboard caps, phone cases, Lego bricks, cases, and most plastic parts you interact with daily are injection molded.
To injection-mold a part, first you must make a mold composed of two or more blocks of metal that fit together snugly. Molten plastic is injected into the spaces between the blocks of metal, allowed to cool, and then removed from the mold. This process is quite fast and is called the “cycle time” of the machine. Typical cycle times of injection molding are around 30 seconds, allowing hundreds of parts to be manufactured quickly.
A “multi-cavity” mold produces many of the same part at the same time, while a “family mold” can produce different parts at the same time. Using either of these mold types helps to reduce the part costs and produce even more parts in less time. The biggest advantage of injection molding over all other manufacturing methods is that the cost to produce a part is much cheaper than the competition after the tooling is completed. Molded plastic parts tend to be in the range of pennies to a dollar each, compared to tens or hundred of dollars with other manufacturing methods. For this reason, Injection molding is the go-to method when producing thousands of parts.
The process of designing and developing the injection molds is complicated and time-consuming. Typically, it takes around 3–4 weeks to machine away the correct geometry of the molds and run sample-molding tests to ensure parts are accurate. Textures can be applied to the molds to create unique surface finishes and patterns as well. Adding texture increases the time to make molds and test parts. Any changes to the part requires changes to the mold, which can delay the delivery date further.
Factoring all this in, it’s safe to assume that injection-molded parts need about 6–8 weeks to be delivered. There are also strict rules for designing parts for injection molding, which must be followed in order to create dimensionally accurate and high-quality parts. For example, parts must have a near uniform thickness, must have slight tapers to angles for textures, and can’t change thickness too quickly. Experts in design for manufacturing (DFM) should be consulted when making parts for injection molding. Luckily, we have dozens of expert mechanical engineers available to help at informal.
CNC machining
CNC (computer numerically controlled) machining is a popular manufacturing method that uses computer-generated code to move a machine in a precise series of motions to fabricate a part. CNC machines have a varying number of moving axes and can take on many forms, from simple three-axis milling machines and two-axis lathes to fascinating five-axis machines that are captivating to watch. The machine you choose would depend on the complexity of the part you want to make. CNC machines are popular for high-precision and low-quantity applications such as fixtures, robotics components, and wooden furniture.
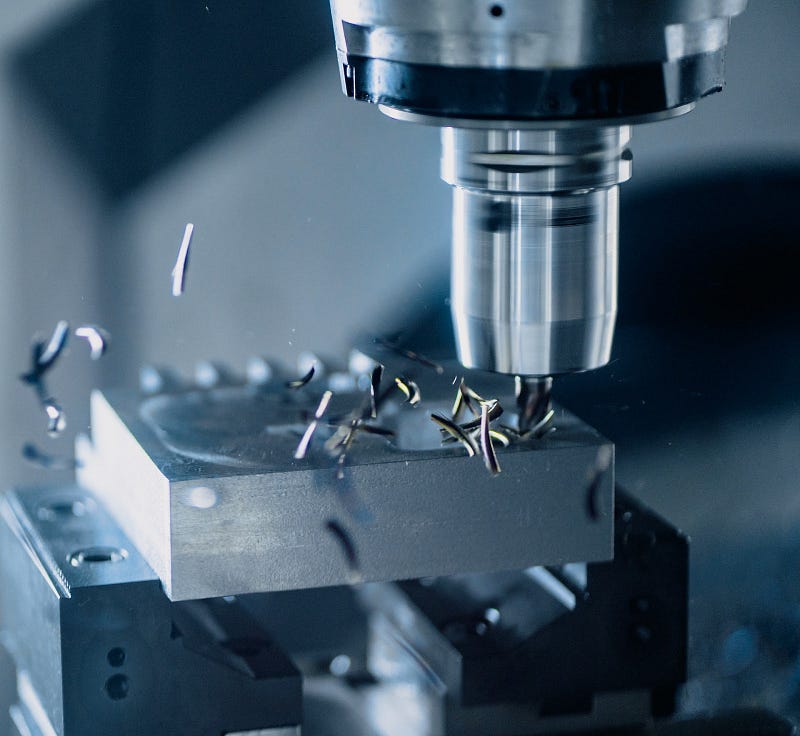
To manufacture a part, a 3D model is loaded into a software program to generate the “toolpath” of the machine as it removes material from a solid block of stock (raw material). This stock can be wood, metal, plastic, foam, or even carbon fiber. The scrap may be recycled, depending on the material and manufacturing method. The toolpath is generated according to rules on how fast the machine can move and how much material can be removed at a time.
Harder to machine materials, such as steel, take far longer to machine than plastics or softer metals like aluminum. Very complex parts could require more complicated machining methods. Fine detail or deep holes require smaller cutting tools and slower machining. Parts with overhanging features could need additional manufacturing steps as well.
Laser cutters and waterjet cutters use the same CNC methods to steer and control a finely focused laser or water jet stream to etch and cut flat materials. These are great for creating flat prototypes of packaging, metal parts to be bent into complex parts, or gasket materials.
Typical quotes for CNC machining include a setup cost for programming the toolpath into the machine and running a sample or two to ensure the machined parts are to the specifications. The one-time setup cost can be a few hundred USD depending on size and complexity. The cost of one CNC-machined part typically comes out to a few USD less than the cost for five or so CNC parts, due to this setup costs. Order at least two parts to get a volume discount.
I have a Prover4030XL CNC but use it mostly as a learning tool to better understand how to program machines. The noise, complexity of programming, and debris generated by the CNC machining process makes it a difficult machine to operate at home. Keep in mind that sites that provide instant quotes are very convenient but tend to be more expensive than reaching out to a vendor directly, typically located in China. Some of my favorite companies to use for CNC machining include SunPe and Quick Cut Manufacturing.
3D printing
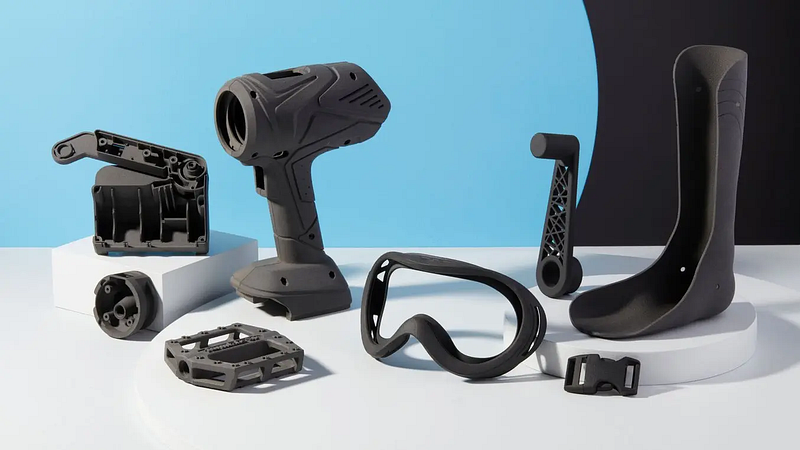
3D printing and CNC machining are cousins in the manufacturing world. The main difference is that CNC machining typically removes material where 3D printing adds material. Previously, 3D printers have been seen as tools for hobbyists to create plastic trinkets, or only good for prototyping, but printed parts are now being used to create shoes, bridges, and rocket engines. 3D printing emerged in the last 40 or so years, and recent innovations have improved on speed, materials, and quality to the point where it’s a viable manufacturing option for both prototype and production parts. 3D printers operate on similar principles as a CNC machine, running from a program that controls the motion of a toolhead. Material is deposited layer by layer to generate a final shape. There are three core methods of 3D printing — FDM, SLA, and SLS — each with their own pros and cons.
FDM
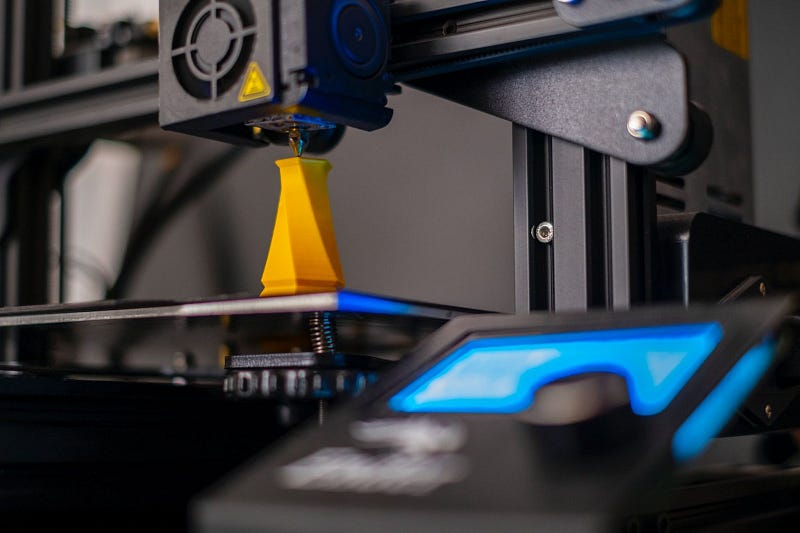
The simplest and most common method of 3D printing is called FDM, or fused deposition modeling. It was first created by Stratasys and later became more affordable and accessible due to companies like MakerBot Industries and Prusa creating lower precision and smaller versions of the industrial machines. With FDM printing, a computer-controlled nozzle is moved around a build plate, depositing a thin layer of plastic or metal onto the plate. The nozzle is lifted away from the build plate by a small amount and again deposits a thin layer on top of the existing layer. This process is repeated until the final shape is generated.
FDM printing typically has visible layer lines from this process, which tend to make the parts fairly weak at the junctions. FDM is commonly used with rigid plastic parts and some metals and is a fantastic method for rapid prototyping concepts. Fancier FDM printers can print in multiple materials at the same time, allowing for more complicated designs or for parts that have large internal cavities. A typical FDM printer prints in a “model” material such as ABS or PLA plastic and a “support” material such as HIPS or PVA, which can be dissolved away after the print is completed, leaving only the model. FDM printing is typically the least expensive of the 3D printing options and can be done at home or work with minimal training.
I tend to use my Creality Ender S1 as the first phase of in-house prototyping, allowing me to get a better sense of scale on a part or test out assembly processes and mechanisms. The lower tolerances of FDM and limitations in size and resolution mean that I typically need to send out for higher-quality prints using other manufacturing methods to gain confidence in my design before manufacturing thousands of units.
SLA
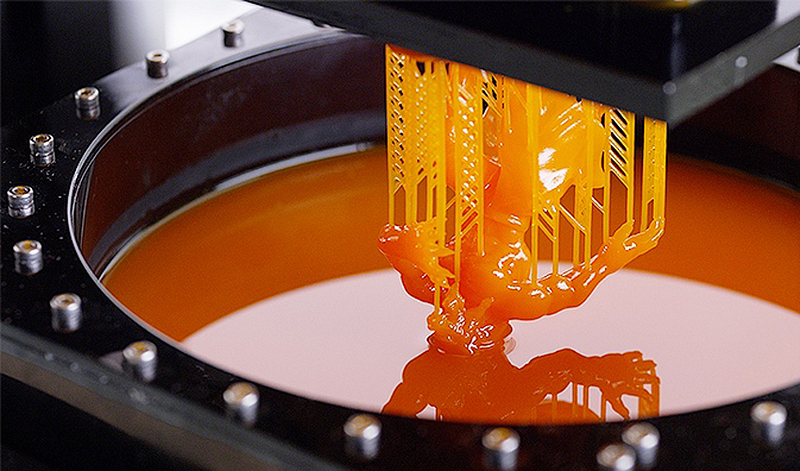
The second most common method of 3D printing is SLA, which has recently become more affordable due to companies like Formlabs and Elegoo creating maker and prosumer versions of these machines. SLA stands for stereolithography and uses a very different technique to 3D print parts. A liquid “resin” is poured into a vat, and the environment is enclosed to prevent stray UV light from entering the chamber. When exposed to specific light waves, the resin solidifies into a very strong plastic-like material. A computer controls the exposure of this resin to light waves by either directing a laser beam or by projecting an image onto the bottom of the vat. The exposed resin “cures” to a platform, which is slowly raised upwards from the vat layer by layer. This process is repeated, allowing the resin to cure to the previous layer, until the final part is complete. The parts are then washed in a bath of alcohol to remove excess material and cured using temperature and specific light waves to ensure the final part is solid and not tacky. Supporting material can be 3D printed to help with overhanging shapes, and these supports can be snipped off and sanded flush.
This process allows for incredibly fine details and layer lines, and new advances from Carbon 3D have drastically reduced the time to 3D print parts using these methods. SLA is a fantastic choice for prototyping high-resolution and medium-strength parts, and can create clear parts for prototyping light pipes and small windows. SLA 3D-printed parts are known for their fine details and smooth surfaces, but many parts are brittle and only get worse when exposed to sunlight for prolonged periods of time. The resin can continue curing until the parts become yellowed or more brittle.
Due to the messy part-cleaning process and smelly chemicals used, I tend to only use my Elegoo Saturn when absolutely necessary. I typically use Craftcloud to compare quotes on SLA parts from various vendors, and I highly recommend Somos GP Plus 14122 or Somos Evolve materials for a great balance of cost and strength.
SLS
A versatile and affordable option, SLS (selective laser sintering) is a very clever method of 3D printing that uses powdered material in a large tub. A computer-controlled laser moves around the top surface of this tub, “sintering” or melting together the neighboring powders into a solid piece of plastic or metal. A very thin layer of powdered material is deposited over the existing layer, and the laser sinters the two layers together. This process is repeated until the model is completed.
SLS printing has layer lines similar to FDM, but they tend to be far less noticeable and much stronger. The powder that isn’t sintered together acts as a support for the sintered material, allowing for cavities and overhangs. A small “weep hole” is typically included in models to allow the powder to flow out of any cavities or pockets.
SLS is a more expensive process than FDM due to the costs of the materials, the machine itself, and the more labor-intensive process of removing parts from the printer and removing the unsintered material. Some of the powdered material can be reused on another print, reducing costs somewhat. SLS prints are fantastic for creating durable parts with medium to high cosmetic requirements. The powdered material leaves parts looking matte and some color variation is common.
Companies like Formlabs and Sinterit are now creating prosumer variations of these machines in the $10K–$20K range, but they’re messy and can be dangerous to operate if you’re untrained. It’s best to send out for SLS parts using a site like Craftcloud, SunPe, or Quick Cut Manufacturing. Keep in mind that large, thin parts manufactured using this process may warp when exposed to heat. Typically, you can correct this by heating the part up with a hair dryer to correct for warp, but dimensional accuracy might be lost.
Regardless of which 3D printing method you chose to fabricate parts, the fabrication costs don’t tend to drop much with quantity. 3D printing is still a slow manufacturing method and there’s labor involved in removing the parts from the printer and cleaning them up. I hope to see the price to 3D-print parts drop over the next decade and expect it to become a fantastic manufacturing method for creating hundreds or even thousands of parts for consumer products soon.
Urethane casting
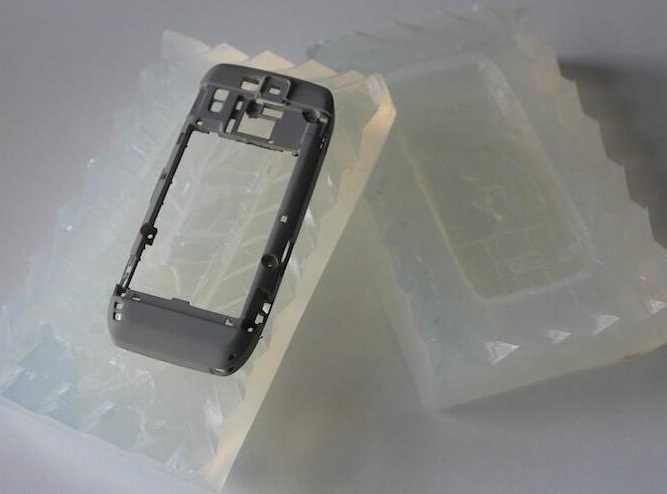
A common method of creating high-quality cosmetic prototypes, urethane casting — or vacuum casting — is a process that creates very accurate copies of a part. Typically, a “master” part is SLA 3D-printed or CNC-machined. It’s encased in silicone, which is cut in half and used as the mold. The “master” part is removed, leaving a void in the silicone where it used to be. Urethane resin is poured into the mold and cured into a rigid or semi-rigid part. The silicone mold is gently peeled away from the part and can be reused between 10–20 times, depending on the size and complexity of the part.
Urethane casting is a great way to prototype parts that need high-quality surface appearance and for rubber-like parts. These parts are easy to paint and can be used for cosmetic models and functional prototypes. The plastic is fairly strong but typically more brittle than injection-molded parts. Due to the flexibility of the silicone material, it’s possible to urethane-cast parts with overhangs and geometries that are difficult to injection mold. Additionally, the thickness of a urethane cast part can vary without any impact to the part appearance or strength, unlike injection molding. A cast part requires hours to cure in the mold, reducing how many parts can be produced in a day. Coupled with the low lifetime of the molds, urethane-cast parts are ideal for a few dozen to a few hundred parts, as long as time isn’t critical.
I tend to use urethane-cast parts when we need to create cosmetic models for photos, beta test units, and when we need multiple high-quality prototypes. Occasionally, we’ve used urethane-cast parts for low-volume production purposes. Recently, we ordered a dozen urethane cast sets of parts for the Lodge Solar Speaker to test assembly, sound quality, and waterproofing of our gaskets and housings. I tend to order multiple durometers, or softnesses, of rubber gaskets when making urethane cast parts to better test waterproofing and assembly difficulty. I highly recommend reaching out to SunPe and Quick Cut Manufacturing for quotes. My rule of thumb for all types of prototyping is that if you can find them on the first two pages of a Google search, you’re probably overpaying.
Which method is right for me?
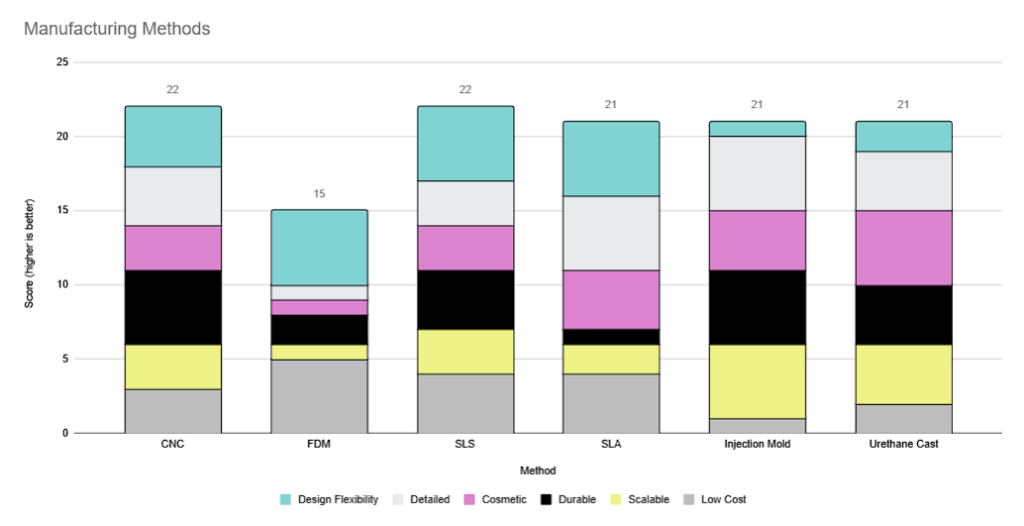
As with most things, the answer to the question “which manufacturing method is right for me?” is “it depends”. It’s likely that multiple manufacturing methods are a good choice for your product, and it may be difficult to decide on which to use. In order to better understand the tradeoffs of each method, it’s helpful to compare them based on cost, durability, appearance, scalability, and detail. In the following comparisons, the higher score corresponds to a better rating.
- Low cost: Let’s factor in tooling costs, labor costs to clean up the parts, material cost, and scrap material to our comparison. At lower quantities, FDM 3D printing is the king here due to the low cost of materials, machines, and little to no setup. Injection molding is the most expensive due to the very complicated and expensive tooling process. At higher quantities, the calculus is in favor of injection molding, since each part manufactured is so inexpensive. 3D printing doesn’t scale well with higher quantities of parts made. CNC machining has limited quantity discounts available but can be fairly competitive in the low hundreds of units.
- Scalable: 3D printing and CNC machining are time-consuming processes that don’t scale well at higher quantities of parts ordered. The typical solution is to add more machines to make more parts. As a result, the price of 3D-printed parts and CNC-machined parts are fairly constant, and there are little volume discounts available. Urethane-cast and injection-molded parts are the opposite. After the molds are made, it’s easy to make more parts. Injection molding takes a few seconds to manufacture each part, while urethane casting requires a few hours.
- Durable: Since SLA prints use a resin that becomes solid when exposed to UV light, it’s difficult to prevent the parts from curing too much and becoming brittle over time. FDM prints tend to be fairly strong in compression against the printed layers, but are very weak along the layer lines and can break easily. SLS prints are very strong in comparison to other 3D printing methods because the sintering process fuses existing layers together. Urethane-cast parts can be fairly strong as well but break easier than injection-molded parts. CNC parts and molded parts are incredibly strong and considered the most durable options available.
- Cosmetic: Due to the visible layer lines, FDM prints score low on cosmetic quality. SLS prints tend to be grainy and can be inconsistent in appearance, while SLA prints have a very high resolution and little to no visible layer lines. CNC parts can be post-processed using a bead blast or tumbling treatment to remove any marks from the machining process, but the options are fairly limited. Urethane cast and injection-molded parts have fantastic surface finishes available. Urethane-cast parts win out slightly on cosmetics since they don’t suffer from sink marks and blemishes that can plague injection-molded parts.
- Detailed: Due to the fairly large nozzles used on FDM prints, the resulting geometry can be lower resolution and lacking in detail. SLS prints suffer from graininess that can round out sharp details. SLA is the most detailed 3D printing method available due to the tiny layer size and resolution of the laser or projector system used to fabricate parts. CNC machining can produce very detailed parts but can’t easily create sharp internal corners since the milling bits are circular. Urethane-cast parts can reproduce most geometries without fail but may have problems with fine details. Injection-molded parts can have incredibly small and fine details and can reproduce texture changes almost perfectly.
- Design flexibility: 3D printing wins here for flexibility, as it’s very easy to print files and create new programs for the machines. CNC machining requires new programming for each change to a design, but the time and costs are fairly low. Changing a urethane cast part requires a new mold to be created, but the cost and time to make new molds is far less than injection molding. Making a change on an injection-molded part can take a month and cost thousands of dollars since the metal molds may need to be welded or machined down and samples need to be tested.

Additional factors to consider when choosing a manufacturing method include UV stability, water resistance, thermal shock resistance, conductivity, shear and compressive force, friction, FDA regulation, biocompatibility and more. For most consumer electronics, the following processes tend to be used in order:
- FDM first prototypes to validate form and general placement of parts.
- SLS and/or SLA detailed prototypes to validate assembly and product appearance.
- Urethane-cast and/or CNC-machine prototypes for beta testing.
- Injection-mold final parts for manufacturing.
The dreaded middle ground
As your design confidence increases over time, it makes more sense to invest in tooling and produce higher quantities of parts. But what happens when you only want to make 250 parts for production? Enter the “dreaded middle ground.”As established above, each manufacturing method may be a better fit depending on the use case and requirements of the parts. Additionally, each manufacturing method may scale, or reduce in cost, better than others.
3D printing is time-consuming and hard to scale easily. Costs don’t drop significantly as quantities increase, and other methods like urethane casting may be more cost effective between a dozen and a few hundred units. It’s difficult to urethane-cast more than a few hundred parts due to the cycle time of a few hours to make each part. While it’s entirely possible to make thousands of urethane-cast parts, it would probably take a month or more, and injection molding may actually be cheaper. New processes like Carbon 3D and MultiJet Fusion are helping to bridge the gap between a few hundred parts and a few thousand parts, but the technologies are still new and not widely available. Carbon 3D also has limitations on geometry and overall part size that can be printed.
Aluminum or “soft tooling” injection molds can be made for lower quantities but need to be replaced after around 3000 uses. It’s cheaper to make these molds, but the cost to replace them can be as expensive as using steel molds, so they’re only useful if you make 3000 or less parts in a lifetime.
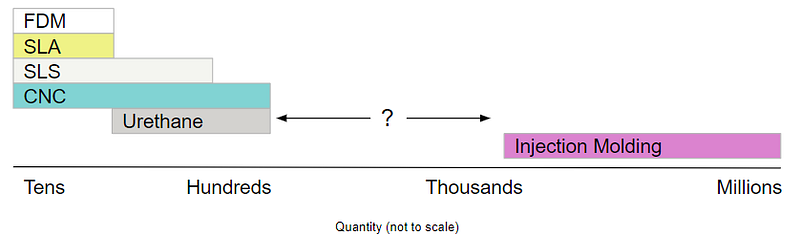
You can see here the “middle ground” of approximately 250–1000 parts, which is too many parts to 3D print or urethane cast in a cost-effective manner, and too few parts to injection mold cheaply. What are your options? This depends primarily on your confidence in your design and your market. If your design is mature and you can afford tooling costs for injection molding, this is probably the best path forward, as part costs only go down further as quantities improve. If you’re still adjusting the design or can’t afford tooling costs, you’re stuck with urethane casting, 3D printing, or CNC machining for a while. If you’re stuck on which manufacturing method to choose, or need guidance, you can always reach out to an informal expert and see what our team of experienced freelancers recommends.